Showing posts with label ipad. Show all posts

Thursday, 19 November 2015

App of the Week : Stackables


Yesterday, Apple has updated their app store with new App of The Week. For this week app is Stackables, Photo editor app with beautifully designed effects and layering. This app comes with 200 effects which crafted by Famous photographer Dirk Wuestenhagen, such as textures, light leaks, Analog filters, Grain and many more. The best part is you can get this app for free and save solid $6 during this week.

As I write this, This app has 4.5 of 5 stars rating which more than 200 reviews from it's user. I can say that it's actually good app for hobbyist or even for beginner user. Stackables is availabe for iPhone and iPad users, you can download it from here and here respectively. 


Friday, 6 November 2015

How to wipe all your data from your iPhone


Sometimes, you may want to reset your iPhone, iPod or iPad to the condition when you buy them in the first place, whether you want to sell it or maybe give it away. All you want to do is wipe your iPhone to erase all the data, including your personal data and make sure it clean before you took your iPhone away.

The first thing to do before you clean your iphone is to backup all your data in your iPhone. Make sure you have the latest backup of your data from your iPhone before you do a wipe. You can backup your data to the iCloud or to your mac / PC using iTunes. Here are the steps to backup your iphone : 

Backup your iphone to iCloud

1. Connect your iPhone to your wifi and to be safe, plug your charger when you doing your backup.
2. Go to Settings
3. Choose iCloud.
4. Select Backup and tap on Back Up Now.


Backup your iPhone using iTunes to your Mac / PC

1. Connect your iPhone to your Mac / PC
2. Launch iTunes app from it.
3. Inside iTunes, click iPhone icon (it may take a while in PC)
4. Click Back Up Now.
5. You will be asked to backup your apps if you want to.


After you backup your iPhone / other Apple devices. It's time to delete all your data in your gadget. Here is how to wipe up your iPhone : 

1. Go to Settings in your iPhone
2. Choose General.
3. Select Reset.
4. Choose Erase All Content and Settings to wipe your data.


Friday, 9 October 2015

How to run two apps simultaneously on your ipad in iOS 9


 In the new iOS 9, Apple introduce new features for apps in iOS 9 which bring true multitasking in iOS 9. There are two types of this feature, which called as Split View and Slider Over.

Slide Over : Open New app while you already open an app.

To do this, you can swipe in from the right side of your screen to open new app along with the existing one.


A new window will open in a third of  the size of your screen and will display the app you choose.  You can also change it by swipe down from the top of your slide over window to show other apps, such as Safari, Maps, Photos, Calendar and stock apps in default iOS 9 installation.

Split View : Open two apps at once
In this type of multitasking feature,  You can run two apps side by side in your ipad screen at the same time. 


In order to do this , You just need to pull down  the top of your screen in Slide Over window and you’ll be have two active apps.  The other thing that you can do with this feature is to resize your app respectively or to have custom size screen for each app.  Just one thing you need to remember that this feature will only available on iPad Air 2.

Wednesday, 7 October 2015

5 Essential iCloud tips


1. Sync your photos automatically using iCloud

You can do this by enabling iCloud Photo library option in your Settings. The iCloud not only upload your photos to the cloud storage but also optimize it when uploading your photo to keep upload times short.

2. Use password protection 

This is a feature that we recommend to use in your iPhone or iPad. Since many iCloud security issues appear recently, this security layer will protect your data in the cloud storage. You can do this by adding password to your icloud keychain. 

3. Limit your upload to iCloud

You may want to limit your data which will be uploaded to your iCloud. To limit your icloud, Open Manage storage section and go to backup options menu. Switch the toggle to enable or disable automatic uploading for each apps installed in your iOS device. 


4. Edit files in your iCloud

Did you know that you can edit your files in your iCloud account ? If you create a document, for example using Pages, you can open them, edit it and apply your changes across your iCloud account. Go try it !


5. Purchase more storage

Do you need more storage for your data? You can purchase additional storage for your iCloud account to save more data. In order to get this, Open your settings app and open storage section in your iCloud menu. Use available storage plan to get more space.

Thursday, 24 September 2015

How to record your iPhone, iPad or iPod screen in your Mac OSX


If you are a developer or power user, you may want to capture your iOS screen. Sometimes you want to upload a preview for your apps / other media in your Apple gadget. Actually, there is a simple way to do this within your Mac.

1. Connect your iphone to your mac using lightning cable.

2. Open QuickTime in your mac.

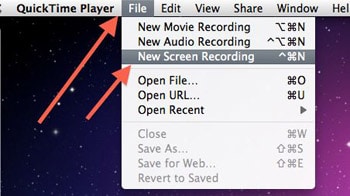
3. In QuickTime, Click File, New Recording to start record your iOS screen


Monday, 21 September 2015

Step by step guide to backup your iphone using alternative tool


Note : This tutorial works on iPhone 6S Plus,iPhone 6S,iPhone 6 Plus,iPhone 6,iPhone 5SiPhone 5CiPhone 5,iPhone 4SiPhone 4iPhone 3GS.

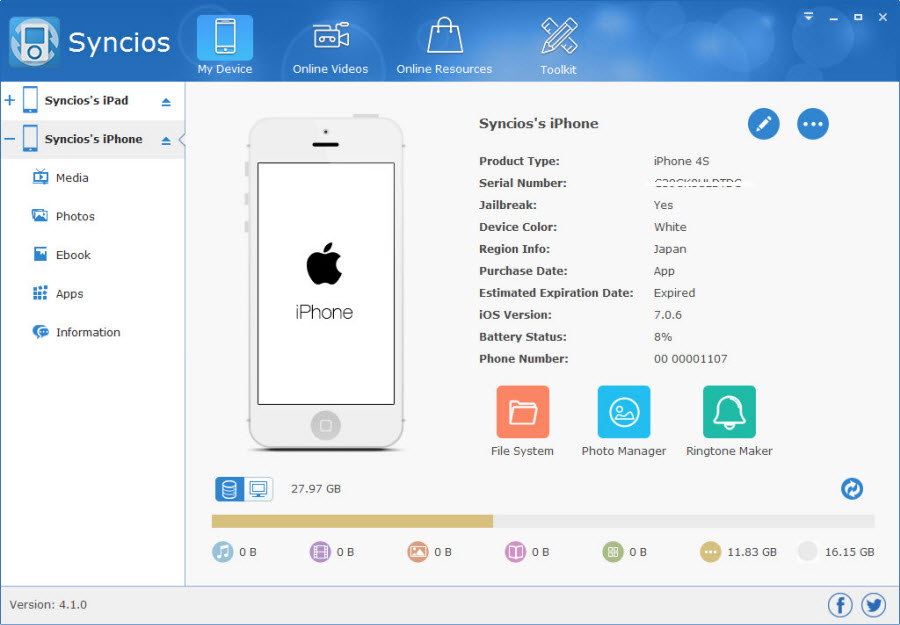
Many Apple users look for alternative to backup their device without using iTunes, especially windows users that often use drag an drop tool when doing any file transfer task. Other alternative to backup your iphone / ipad / ipod is using a software called Syncios. This is free to download, but they also offer pro version which offer more features. Even it's an alternative tool, it still need iTunes to operate this tool. Actually, Syncios provide more familiar UI for windows user that often use windows explorer to transfer their files. 

1. Download and Install Syncios

2. Connect your iphone / ipad / ipod to your PC and launch syncios. The software will automatically recognized it.

3. Click on My device. There will be 4 tabs : Media, Photos, Apps, Information.


4. Choose which one you want to backup, for example, you want to manage your photos. Click on Photos menu in the left side.

5. Select all photos you want to backup and Click Export Photo.


6. Then, browse where you want to place your backup.


7. Click Export to backup your photos. 

Thursday, 17 September 2015

How to migrate from Android to iOS easily


Recently, Apple released an android app to help android user migrate to iOS. It's called Move to iOS. With this tool, you can migrate your contacts, calendar, bookmarks, email accounts, messages, photos to iPhone, iPad or iPod Touch. This app can be installed to Android 4.0 and above.


What interesting about this tool is that you don't need backup your android phone to your cloud storage, because the tool will synchronize it through wifi between your android and iPhone / iPad / iPod touch.


When setting your new iOS device, user can choose Move data from android option in Apps & data setting. After you've done this, open Move to iOS app in your android and wait for 10 codes that will appear in your iPhone screen. Enter that codes to your android in order to authenticate both devices. Next you can choose what data you want to migrate. After the migration data, double check it and you are good to go !


Monday, 14 September 2015

5 Tips to secure your iphone and iPad from hackers


1. Enable PIN or Fingerprint security
This is the most basic security setting that you must enable in order to add first layer security to your iphone or ipad. Just go into settings -> general tab and choose "Touch ID & passcode lock".

2. Create more complex passcode
In creating your passcode, you can use more complex passphrase than 4 digit passcode. To do this go to settings , then "Touch ID & Passcode" and turn "Simple Passcode" off. you can use upper and lower letters, numbers or symbol.

3. Self-destroy
If you afraid your sensitive data leaked, iphone can offer you to erase your data. You can set your iphone to erase your data after 10 wrong PIN entry. Under the same page on settings you can enable "erase data". This is also apply to fingerprint authentication. If your iphone don't recognize the correct fingerprint in 3 times, then it will switch to PIN entry.

4. Privacy settings 
One more setting that you can set to give restriction to your iphone in order to improve your security. You can set permission of each apps installed in your iphone. In order to do this, Go into your settings app and then the "privacy" tab. Set each apps in that setting.

5. Disable autofill
An important setting that you may also consider in order to prevent your sensitive data leaked. Generally, safari will offer auto complete in filling web forms, including name, username, credit card data. This can be a hole for hackers to get in. To turn it off, go to settings, then general and "Passwords & AutoFill".

Monday, 7 September 2015

5 iPhone hacks you may not know !

1. Check tweet without opening twitter app
Do you know you can check your favourite user tweet without opening twitter app? You can ask Siri by saying "Whats [twitter handle] saying " for example "What's paul john saying ?"


2. Alternative undo typing
You can undo your typing by shaking your iphone side to side. Try this out!

Image result for undo typing iphone

3. Dark theme for your iphone
You can change your iphone menu color by changing it. To do this, go to Settings > General > Accessibility and select Turn on invert colors


4. Type numbers without changing your keyboard to numerical view.
This can be done by tap and hold "123" button and slide to number you want to type.


5. Show timestamp in Messages 
Just Slide left in your conversation screen to see the timestamp. The timestamp will show in the right of your screen

Thursday, 3 September 2015

How to disconnect your Bluetooth accessories in iOS 9 without forgetting them


In the recent iOS 9, Apple provide new feature in disconnecting your Bluetooth accessories. In previous version of iOS, you simply disconnect your Bluetooth accessories with the option “Forget this device” which also prevent automatic pairing in the future when you try to use it again.

For the iOS 9, there is new option in your Bluetooth devices. To view this option, Goto Settings, Choose Bluetooth and tap “i” button in the circle. 


You will see that you can choose between “Disconnect” or “Forget this device”. When you choose disconnect option, you can keep your Bluetooth accessories in the list of stored wireless devices.


This features really helpful for users who often switch between devices when using Bluetooth accessories. So, give it a try !

Sunday, 30 August 2015

How to organize your ebooks in iBooks


If you are a person who like to read a lot of book in ipad or iphone, this tip can be useful to you. There is a way to keep your ebooks organized. Follow this step to manage your ebooks in iBooks :


1. Tap All Books tab (top of the app), the Collections menu will be opened.
2. Tap + New Collection menu in the bottom and type a name for your new created collection.
3. Go back to Collections menu and tap Edit menu to remove, rename or change the books in the collections.

Saturday, 29 August 2015

7 Tips how to save your iPhone battery


In every new iOS update, there will be new features and interesting graphics given to the user. In effect of this, iphone or ipad battery drained faster than before. There are several tips that you can applied to your iphone to save your battery :

1. Check for battery draining applications
The step is easy, just go to Settings > General > Usage > Battery Usage. In there, you can see which applications drain your battery by percentage. When you find some particular apps that have high percentage, try to check whether your application often do background process, or have more notifications than the other. 

2. Be aware with the location service feature in your applications
You can also check this service in your ios device setting. Go to Settings > Privacy > Location Services. Find any applications that use this feature and choose whether you want to allow the application use location service or not. 

3. Manage notifications and widget
Manage application notification setting. You can do this by adjust your app notification in Settings > Notifications and choose the application that you want to manage. 


4. Turn off auto downloads
Manage your auto downloads setting in Settings > iTunes & App Store. We recommend you turn off the Apps and Updates options because you can check the update manually when needed or sync with other apple device later. This will help you save your battery.


5. Turn off handoff feature
Basically, this feature let you work simultanously between iOS device (iOS 8 and above) and OS X Yosemite in mac device. If you don't do this often, just turn off this feature. To do this, Go to Settings > General > Handoff & Suggested Apps

6. Manage your cellular data & wifi connection
If there is available wifi in your area, Use your wifi instead your Cellular Data. When you do this, don't forget to turn off your Cellular Data. You can manage it in Settings > Cellular > Cellular Data > Off. Other network activity that also drain your battery is Personal Hotspot. So, make sure you turn off this feature off if you not use it.

7. Manage Screen Brightness
Screen brightness is one of the factor of battery efficiency. In default, the brightness setting will be set into Auto-Brightness. This is good to make your device automatically adjust your screen to make sure you get clear visibility, but sometimes can get your battery drain faster in a certain use. There is a tip to help you save your battery. If you often stay in an area with sufficient light, you can manage your screen brightness manually, Don't get to low or to bright, make sure the setting give you enough visibility for you to use your ios device. To adjust your screen brightness, Go to Settings > Display & Brightness